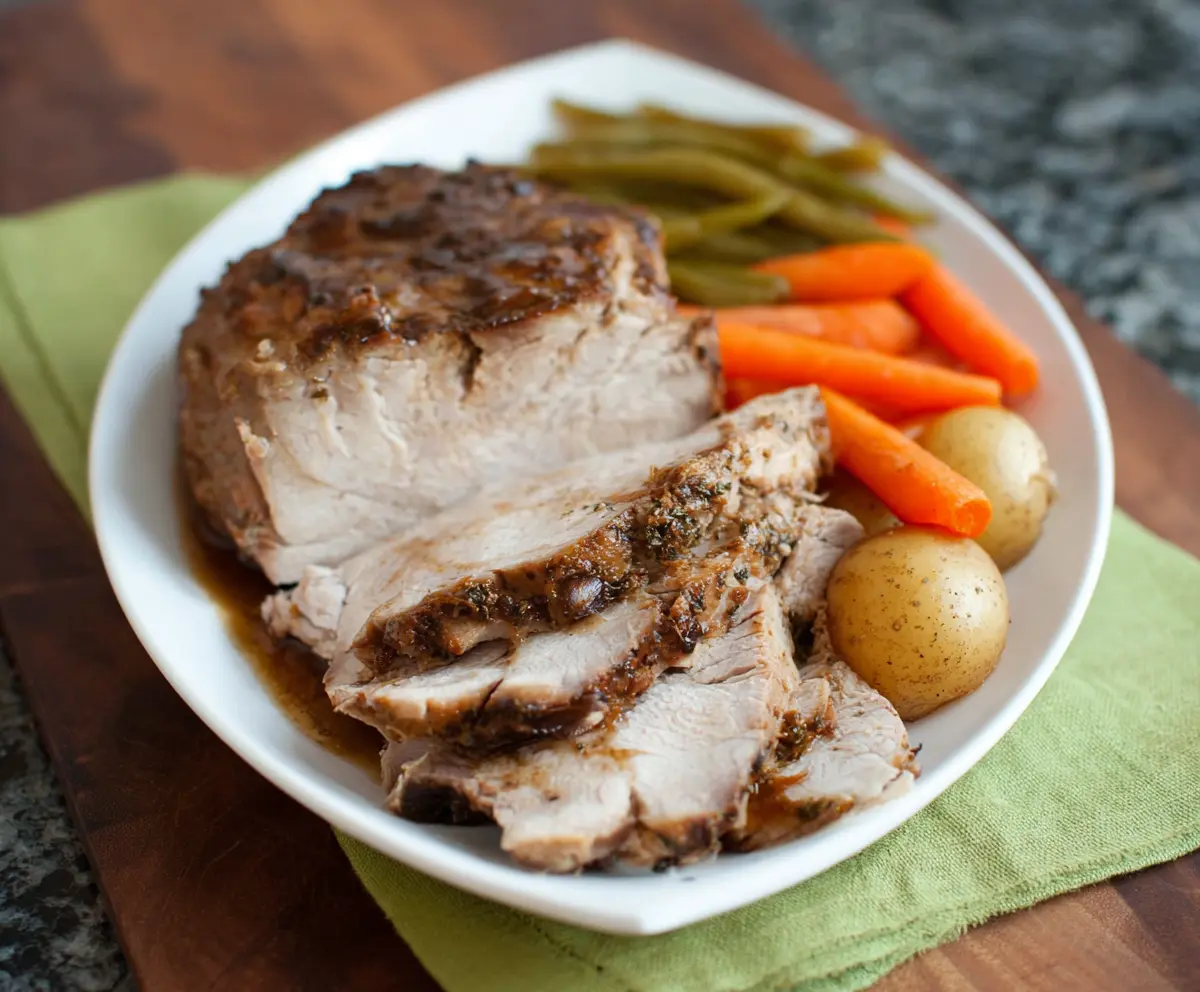
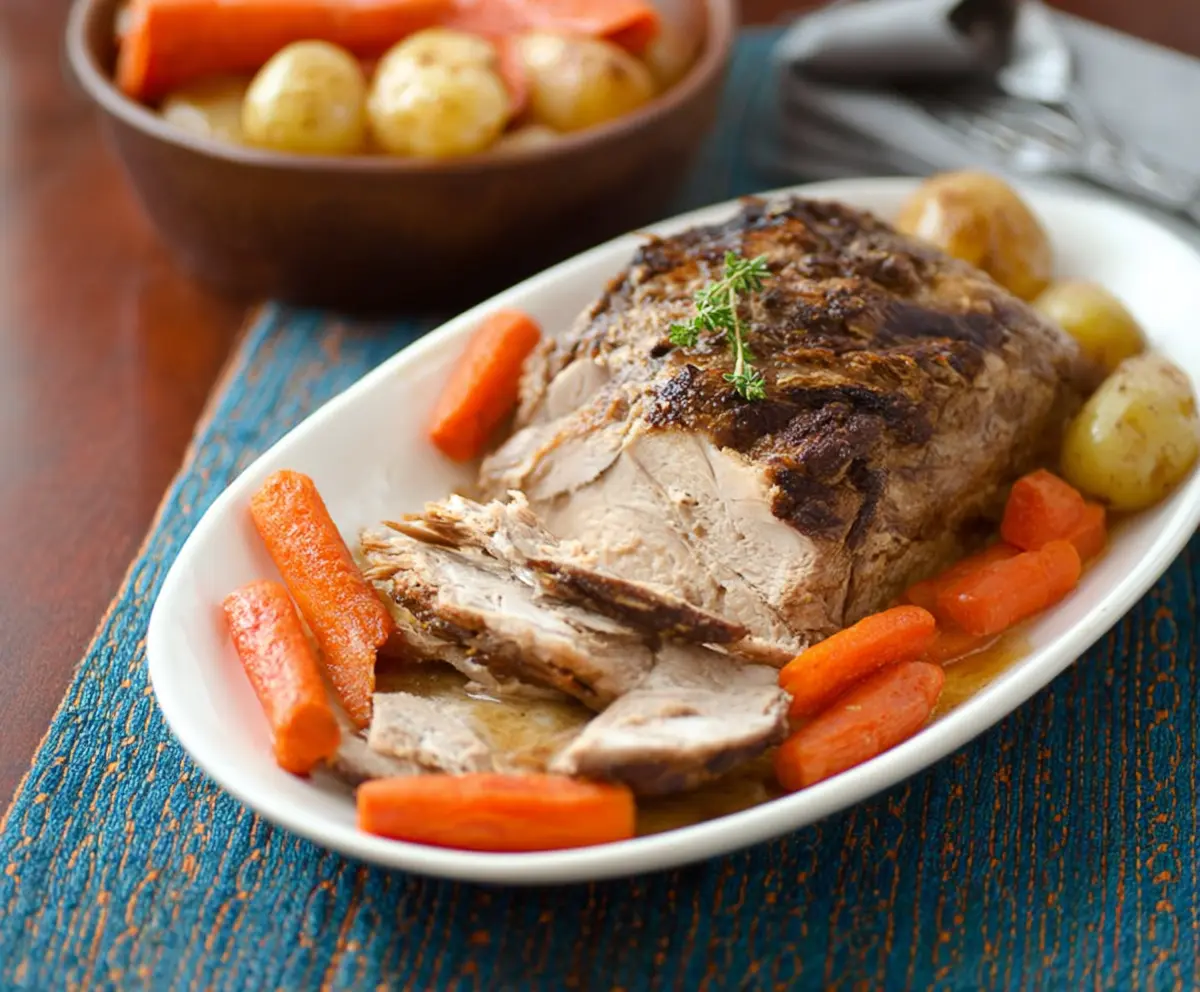
This pressure cooker pork roast is a real winner! It turns tough cuts of meat into tender, juicy bites in no time. With just a few spices and a touch of broth, it’s super easy to whip up.
I love how quickly this dish cooks—perfect for busy days! Serve it with some veggies and you’ve got a warm, hearty meal that feels like a big hug. Who doesn’t love that? 😊
Key Ingredients & Substitutions
Pork Roast: A shoulder or loin works best here for great flavor and tenderness. If you’re looking for a leaner option, pork tenderloin can be used, but it cooks faster, so keep an eye on it!
Olive Oil: This is perfect for browning the pork. If you want a different flavor or need a substitute, try avocado oil or even butter for a richer taste.
Onion and Garlic: Both add depth to the dish. If you’re low on fresh onion, dried onion flakes can substitute. Garlic powder can work too, but the fresh stuff always gives the best taste!
Herbs: I like using rosemary, thyme, and sage for a classic flavor. Feel free to swap these out for Italian seasoning or any dried herbs you love. Fresh herbs are also fantastic if you have them!
Broth: Low-sodium chicken broth enhances flavor without too much salt. Vegetable broth is a great alternative, especially for vegetarian options. In a pinch, plain water works too.
Veggies: Baby potatoes, carrots, and green beans complement the roast nicely. You can toss in other root veggies like parsnips or sweet potatoes based on your preference or what’s in your fridge!
How Do I Properly Brown the Pork Roast?
Browning your pork roast is key to building flavor. Here’s how to get it just right:
- Start with a hot pressure cooker set to sauté mode. Add olive oil and wait until it shimmers.
- Make sure the pork is patted dry; this helps it to brown nicely. If it’s wet, it steams instead of browning.
- Brown the roast on all sides for about 3-4 minutes each side. Don’t rush—it’s worth it!
- Once browned, remove the pork and sauté the onion and garlic in the same pot to pick up all those flavorful bits stuck to the bottom.
By taking this step, you’re creating a deep flavor profile that lifts your entire dish! Enjoy your cooking!
How to Make Pressure Cooker Pork Roast
Ingredients You’ll Need:
- 3 to 4 pounds pork roast (shoulder or loin)
- 2 tablespoons olive oil
- 1 small onion, chopped
- 4 cloves garlic, minced
- 1 cup low-sodium chicken broth or water
- 2 teaspoons dried rosemary
- 2 teaspoons dried thyme
- 1 teaspoon dried sage
- 1 teaspoon salt
- 1/2 teaspoon black pepper
- 1 tablespoon Worcestershire sauce (optional)
- 1 pound baby potatoes, washed
- 4-5 carrots, peeled and halved
- 1 cup green beans, trimmed
How Much Time Will You Need?
This recipe takes about 10 minutes to prepare, followed by 45 minutes of cooking time, plus an additional 15 minutes for the vegetables. In total, you’ll be enjoying a delicious meal in about 70 minutes!
Step-by-Step Instructions:
1. Season the Pork Roast:
Start by patting your pork roast dry with paper towels. In a small bowl, mix together the salt, black pepper, dried rosemary, thyme, and sage. Then, rub this herb-spice mixture all over the pork roast, covering it well.
2. Sear the Pork:
Next, set your pressure cooker to sauté mode. Add the olive oil and let it heat up until it shimmers. Carefully place the pork roast in the pot and brown it on all sides for about 3-4 minutes per side. This creates a nice crust. Once browned, remove the roast and set it aside.
3. Sauté Onion and Garlic:
In the same pot, add the chopped onion and minced garlic. Sauté them for about 2-3 minutes until they are softened and fragrant. This will add wonderful flavor to your dish!
4. Add the Liquids:
Pour in the chicken broth (or water) and Worcestershire sauce (if using). Use a wooden spoon to scrape up all the flavorful bits stuck to the bottom of the pot. This step is important for rich flavor!
5. Pressure Cook the Pork:
Return the pork roast to the pressure cooker. Seal the lid tightly and set it to cook at high pressure for 45 minutes.
6. Quick Release the Pressure:
When the cooking time is complete, carefully perform a quick release of the pressure. This lets out steam quickly so you can safely open the lid.
7. Add Vegetables:
Place the baby potatoes and halved carrots around the pork roast inside the cooker. Seal the lid again and cook on high pressure for an additional 5-7 minutes.
8. Quick Release Again:
Once finished, do another quick release. After releasing pressure, add the trimmed green beans to the pot. You can either let them steam with the residual heat for about 5 minutes with the lid off or sauté them briefly until tender.
9. Serve:
Carefully remove the pork roast and vegetables from the pot, transferring them to a serving platter. Let the pork roast rest for about 5 minutes before slicing it into tender pieces.
10. Optional Gravy:
If you wish to make gravy, you can thicken the cooking liquid by simmering it on sauté mode for a few minutes and stirring in a mixture of cornstarch and water.
11. Final Touch:
Serve your sliced pork roast with the delicious cooked potatoes, carrots, and green beans, all drizzled with the savory pan juices or gravy. Enjoy your hearty meal!
Enjoy your tender, flavorful pressure cooker pork roast with hearty veggies!
Can I Use a Different Cut of Pork for This Recipe?
Yes, you can! While shoulder and loin are ideal, pork tenderloin is also a good option. Just keep in mind that tenderloin cooks faster, so reduce the pressure cooking time to around 20-25 minutes.
How Do I Store Leftovers?
Store any leftovers in an airtight container in the refrigerator for up to 3-4 days. You can also freeze the pork roast pieces and veggies for up to 3 months. Just allow them to cool completely before freezing!
What Can I Substitute for Chicken Broth?
If you don’t have chicken broth on hand, vegetable broth is a great alternative. Water can also be used, but it may result in less flavor, so consider adding a few extra herbs or spices if you go that route.
Can I Cook Additional Vegetables Alongside the Pork?
Absolutely! You can add other vegetables like parsnips, sweet potatoes, or even corn towards the end of the cooking process. Just make sure they’re cut into similar sizes to ensure even cooking!