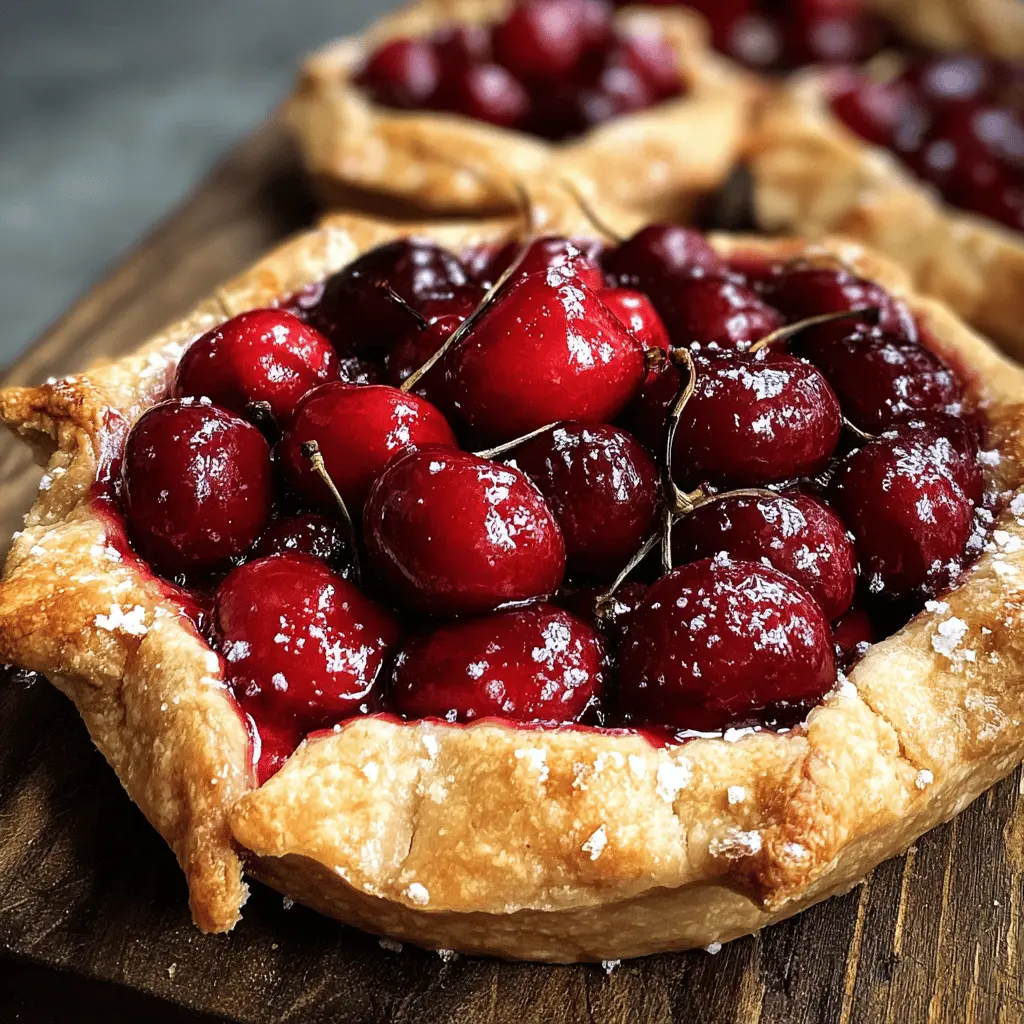
These Easy Rustic Cherry Tarts are a treat! With juicy cherries wrapped in flaky pastry, they’re perfect for a cozy dessert. No need for fancy techniques here!
I love how simple they are to make—just fill and fold, and you get a beautiful dessert. Serve them warm with a scoop of ice cream, and watch the smiles! 🍒
Key Ingredients & Substitutions
Pie Dough: I love using store-bought pie dough for convenience; it makes this recipe quicker and easier. If you’re feeling adventurous, homemade dough can be a great choice as well. You can even use puff pastry for a flakier texture!
Cherries: Fresh cherries really shine in this tart, but if they’re out of season, frozen cherries work just as well. Just remember to thaw and drain them first. If cherries aren’t available, you could use blueberries, peaches, or apples instead!
Sugar: Granulated sugar helps to sweeten the cherries, but you could also use brown sugar for a deeper flavor. If you’re cutting sugar, try using a sugar substitute, just keep in mind the amount may vary.
Lemon Juice: This adds brightness to the tart. If you don’t have lemon juice, try lime juice or even a splash of vinegar for a similar effect.
How Do You Make Sure the Tart Crust is Perfectly Flaky?
A flaky crust makes all the difference in your rustic cherry tart! Here are some tips to nail it:
- Keep your pie dough cold. Warm dough can lead to a tough crust. If needed, pop it back in the fridge for a bit before rolling it out.
- Don’t overwork your dough. When rolling it out, be gentle and try to handle it just enough to get it into shape.
- Brush the edges with egg wash for a lovely golden finish. It also helps the sugar stick!
- Let the tart cool a little after baking. This helps set the filling and makes it easier to slice!
With these tips, you’ll have a delightful and beautifully rustic cherry tart that wows! Enjoy!
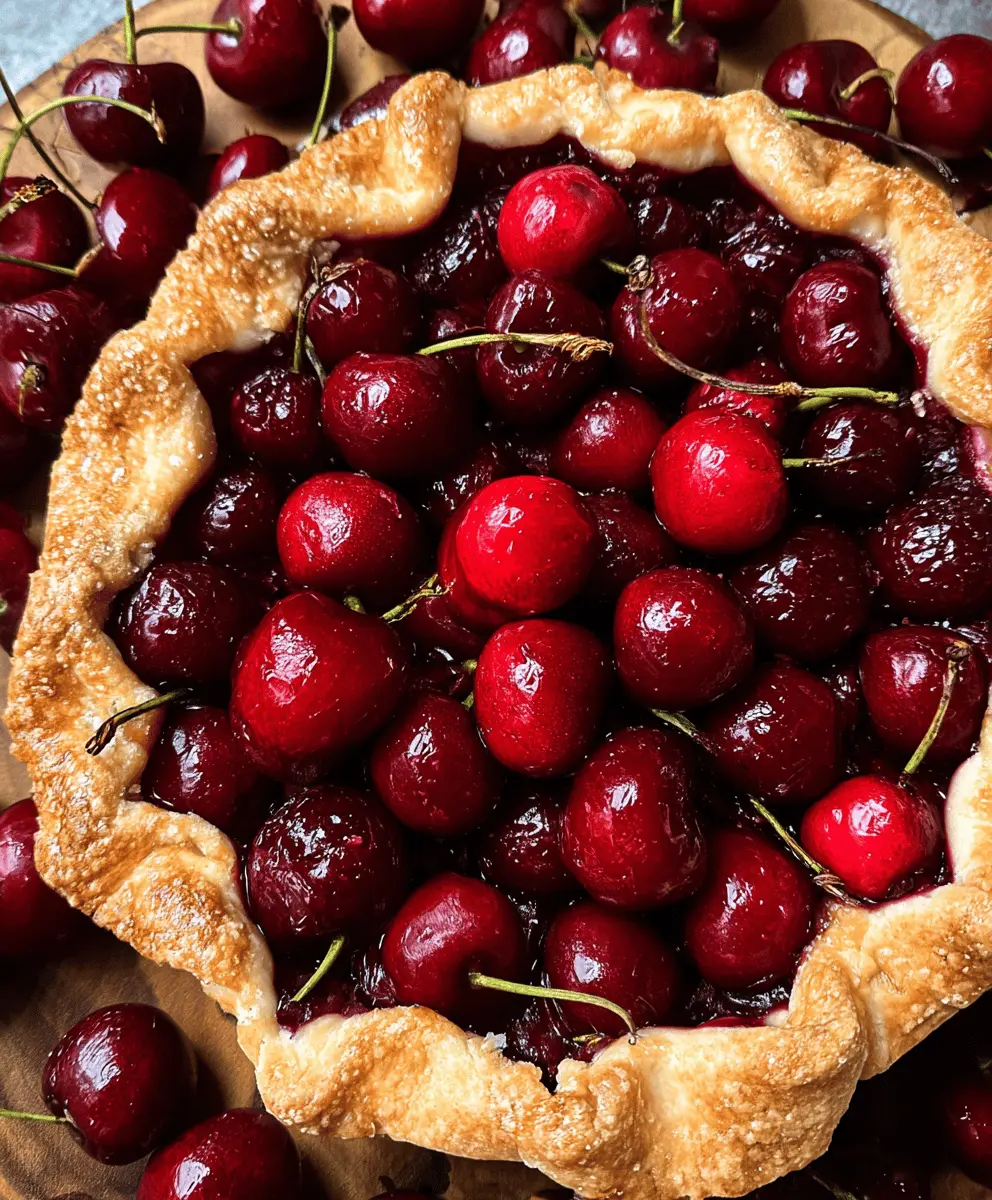
Easy Rustic Cherry Tarts
Ingredients You’ll Need:
- 1 sheet of store-bought pie dough (or homemade pie crust)
- 2 cups fresh or frozen cherries, pitted and halved
- 1/4 cup granulated sugar (plus extra for sprinkling)
- 1 tbsp cornstarch
- 1 tsp lemon juice
- 1/2 tsp vanilla extract (optional)
- 1 egg, beaten (for egg wash)
- Turbinado sugar or coarse sugar for sprinkling on crust
Time Needed:
This recipe will take about 10 minutes to prepare and 35-40 minutes to bake. In total, you’ll need around an hour to enjoy these delightful cherry tarts!
Step-by-Step Instructions:
1. Preheat and Prepare
Start by preheating your oven to 375°F (190°C). While that’s heating up, line a baking sheet with parchment paper. This step keeps the tarts from sticking and makes for easy cleanup.
2. Mix the Filling
In a bowl, toss together the pitted and halved cherries with the granulated sugar, cornstarch, lemon juice, and vanilla extract (if using). This will create a sweet filling and help thicken the juices!
3. Roll Out the Dough
Lightly flour your workspace and roll out the pie dough into a circle about 12 inches in diameter. It doesn’t have to be perfect—rustic is the name of the game!
4. Assemble the Tart
Place the cherry mixture in the center of the dough, making sure to leave a 2-inch border around the edges. This is where the magic happens!
5. Fold the Edges
Now, fold the edges of the dough over the filling. Don’t worry about making it too neat—just create some lovely pleats to hold in the cherries while keeping the center open to show off the filling.
6. Add the Finishing Touches
Brush the folded edges with the beaten egg for a beautiful sheen and sprinkle them generously with coarse sugar. It adds a lovely crunch and sweetness to the crust!
7. Bake the Tart
Carefully transfer the tart to your prepared baking sheet. Bake in the preheated oven for 35-40 minutes, or until the crust is golden and the cherries are bubbly. Your kitchen is going to smell amazing!
8. Cool and Serve
Once baked, remove the tart from the oven and let it cool slightly on a wire rack. It can be enjoyed warm or at room temperature. Consider serving it with a scoop of vanilla ice cream or a dollop of whipped cream for the ultimate treat!
Enjoy this simple, beautiful cherry tart—it’s a delightful dessert that’s perfect for any occasion!
FAQ for Easy Rustic Cherry Tarts
Can I Use Frozen Cherries Instead of Fresh?
Absolutely! Frozen cherries work just as well, but be sure to thaw them first and drain any excess juice. This helps prevent a soggy crust!
How Should I Store Leftover Tarts?
Store any leftovers in an airtight container in the fridge for up to 3 days. To enjoy them warm, you can reheat them in a 350°F (175°C) oven for about 10 minutes.
Can I Make the Tart Ahead of Time?
Yes! You can prepare the tart up to the point of baking, then cover and refrigerate for a few hours or overnight. Just let it sit at room temperature for 20-30 minutes before baking for the best results.
What Can I Substitute for Cornstarch?
If you don’t have cornstarch on hand, you can use all-purpose flour or tapioca starch as a thickening agent. Just use the same amount (1 tbsp) to help thicken the cherry juices!